Your DIY Guide to Installing Moulding, Trim, and Casing
Whether you're a beginner or a seasoned DIYer, we have you covered. This guide will take you through the process of installing DakotaTM prefinished moulding. We'll walk you through every step of the process, from choosing the right tools to adding the finishing touches. Let's get started on transforming your home today!
Understanding the Profiles
DakotaTM has various profiles for a variety of applications, all of which will add the finishing touch to your home, not only adding aesthetic appeal but also serving a functional purpose. Let's take a closer look at what the profiles are, the different sizes available, and the benefits of installing them.
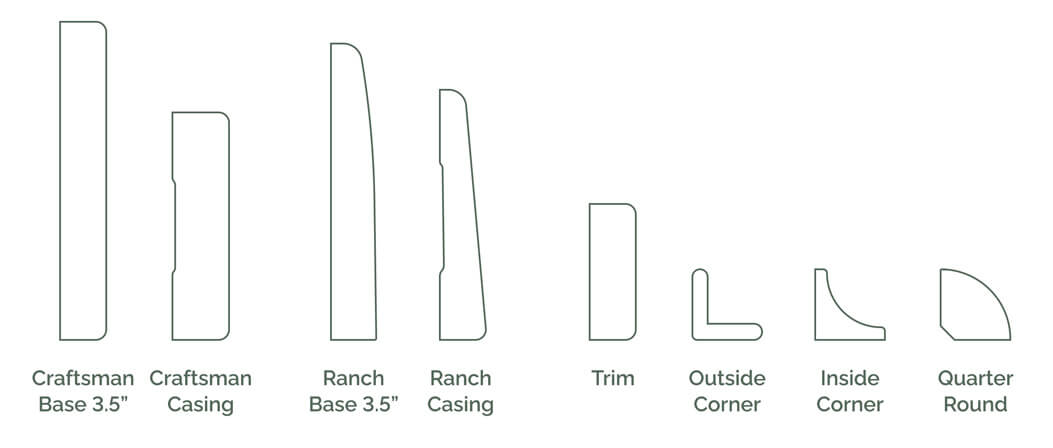
Profiles:
- - Baseboard Moulding helps to finish the joints between the wall and floor or wall and ceiling.
- - Casing
covers the gaps around windows and doors, providing a framed look. - - Trim
utility moulding for any purpose, from decoration on an accent wall to a door stop. - - Outside Corner add to any corner for a presentable edge or for more protection.
- - Inside Corner clean transition for corner of wall paneling or planking.
- - Quarter decorative addition to baseboard moulding as a subtle finishing detail.
- - Jamb Leg used to finish any door opening, use two jamb legs and cut an additional for a header.
Aside from enhancing your home's appearance, moulding hides imperfections and protects high traffic areas from extra use. Plus, it can add value to your property, making it more attractive to potential buyers.
Getting Ready for Installation
Before you start installing, you'll need to prepare the area properly. Here's how to get started:
- Measuring: Measure the length of each wall or area where you plan to install moulding. Add up the total lengths to calculate how much material you'll need. Always add a little extra to account for mistakes or miscalculations.
- Removing Old Moulding: If you're replacing old moulding, you'll need to remove it carefully to avoid damaging the surrounding surfaces. Once removed, clean the area thoroughly to ensure a smooth surface for the new installation.
- Repairing and Painting: Repair any damaged walls and repaint for the best look once moulding is installed. Fill in any holes or cracks with a suitable filler, sand the surface until it's smooth, and apply a primer. Menards offers a range of primers and fillers to help you get the job done right.
Installation Techniques
Installing moulding well involves several techniques. Here's what you need to know:
- Attached Moulding: Secure each piece to the wall with a hammer or pneumatic brad nailer and 1-1/2" brad nails. Drive the nails into the wall every 9"-12", with at least every third nail into a wall stud for a strong hold. Countersink the nails and fill the holes with wood filler for a seamless finish.
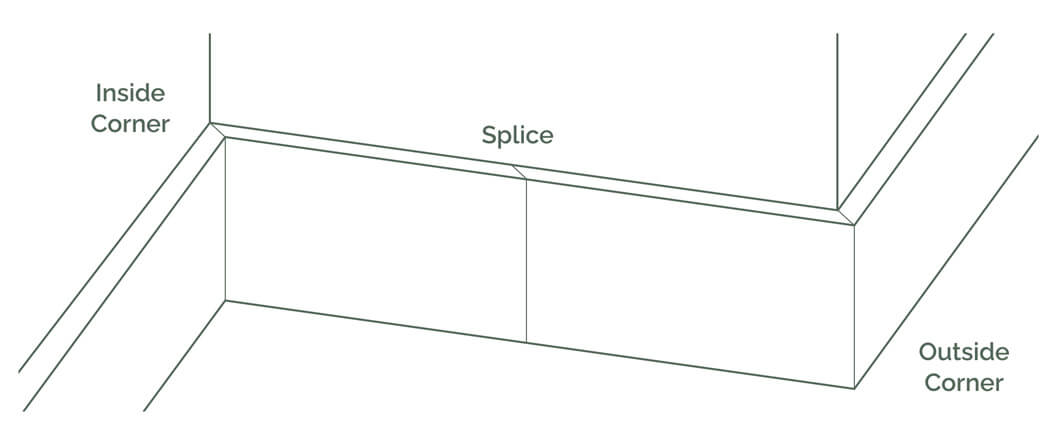
- Cutting Mitered Corners: To achieve clean corners, make precise cuts using a miter saw. Many corners are not square, so ensure the angles of each piece match perfectly before attaching them to the wall.
- Splicing Two Pieces of Moulding: When one moulding won't cover the span, you'll want to conceal the joint between two pieces of moulding well. Cut each piece to opposite 45° angles and test fit to ensure a clean installation. Apply construction adhesive to the cut ends of the moulding and nail through each piece and into a wall stud. Wipe off excess adhesive immediately.
- Dealing with Uneven Surfaces: If your walls or ceilings are uneven, shim the uneven areas with thin wood strips or shims. This will provide a level base for attaching the moulding, trim, and casing.
Visit Menards for a wide selection of prefinished moulding, trim, and casing options to suit your style and project needs.
Tips for a Professional Finish:
Use a miter saw and a laminate/melamine blade or a blade with at least 60-80 teeth for clean and precise cuts. Always measure twice before cutting and dry fit each piece of moulding. Secure the pieces with construction adhesive in addition to nailing for added stability.
Caulk each joint if desired, use a paintable caulk and wipe away excess for a seamless transition from moulding to wall or between joints.
Fill any nail holes or gaps with a wood filler or putty that matches the color of your moulding, trim, or casing. After the filler or putty has dried, sand the surface gently to remove any imperfections or rough edges. Wipe away any dust with a clean cloth before painting.
To maintain your moulding, trim, and casing, dust them regularly using a soft cloth or feather duster. Avoid abrasive cleaners or harsh chemicals. If they become dirty or stained, clean them gently with a mild soap and water solution, then dry thoroughly.
Troubleshooting Common Issues:
Uneven walls can be addressed using shims or scribes. Coping inside corners requires careful cutting with a coping saw. Nail holes can be filled with wood putty, then sanded smooth before painting or staining.
If your moulding warps or bows, ensure proper ventilation and reinforce with additional fasteners. If paint or stain isn't adhering properly, ensure the surface is clean and lightly sand it to improve adhesion.
See our full installation instructions here.