Closet Design: How to Measure and Plan for Your Custom Closet?
Looking to remodel your closet to make the most of your storage space? Well, you're in the right place! Whether you enjoy DIY projects or you're looking to bring some organization to your life, understanding how to measure and design your closet is a vital first step. This guide will walk you through the process, providing handy tips and techniques to streamline your project, and introduce you to our ŪCRËATË® Closet Planner, so you can start designing the closet that best fits your space.
Let's start with preparing and measuring your closet. At Dakota Closets, we know the importance of a well-designed closet, and we're here to help you achieve your storage dreams.
Preparation is Key: Things to Know Before you Start Measuring.
Designing your closet begins with accurate measurements. Getting these measurements right will ensure your new closet fits like a glove and will help in maximizing the storage and functionality of your space. Here's how to get started:
First, gather the tools you'll need for the task - a tape measure, a level, and a notepad to jot down your measurements. For non-rectangular closets, drawing a floor plan view on graph paper might be helpful, you can print graph paper from our Dakota Closets Buying Guide. These tools will ensure you get the perfect dimensions of your space.
Before you begin, clear out your closet. Remove clothing, shoes, and accessories - this gives you a clear view of the space, allowing for accurate measurements. Once your closet is empty, you're ready to start measuring.
When you start, you will measure the width, height, and depth of your closet, taking multiple measurements on each wall to ensure accuracy. Record the smallest measurement for each wall. Also, take note of and measure any existing shelves, rods, or fixtures that you plan to retain in your new closet design. This will include windows, doors, outlets, light switches, and heat registers.
Pro tip: Measure wall to wall and take note of the thickness of baseboard moulding in your room. Dakota Closets uprights are notched at the bottom to work around moulding, but in some circumstances, you may prefer to remove it. Specifically, when going wall to wall or adding a corner in your design with baseboard moulding on the side walls, there will be a gap between the wall and the upright, you can leave this or you can remove 14" of baseboard moulding for a flush fit.
Proper preparation and accurate measurements are the first steps to creating a well-organized and functional closet. With these steps complete, you're ready to dive into how to measure your closet.
Getting the Measurements Right, How to Measure your Closet.
Accurate measurements are the first step of a successful closet remodel project. This step-by-step guide will help you measure the width, height, and depth of your closet with precision. After you have your measurements you can bring those into our ŪCRËATË® Closet Planner tool to design your space.
Step 1: Measure the width of your closet from wall to wall using a tape measure, again keep in mind your baseboard moulding as well as measuring any light switches, outlets, heat registers, and anything else that will potentially interfere with your closet. Record your measurements in your notepad.
Pro tip: Drawing a floor plan view is an easy way to understand the width of each wall in your closet. Eventually, you will add your closet measurements into UCREATE this way.

Step 2: Measure the height of your closet from the floor to the ceiling. Again, record the measurements.
Dakota Closets have an installation method for just about any ceiling height, with floor standing upright heights of 21", 41", 61 1/4", and 86 1/2", and wall mounted upright heights of 21", 41", 61 1/4". Use one height across the entire closet, or get creative with different heights.
Step 3: Measure the depth of your closet from the back wall to the front edge. Make sure to measure at multiple points along the depth to account for any irregularities. This is easiest for closets that are rectangular, if your closet is a unique shape, measure the closet in sections, noting the depth in each section.
For reach in closets, it is important to understand the width of the return walls at the opening of your closet and the depth of the closet. For any closet with a depth of less than 24", it will be difficult to hang clothes and reach shelves when at the sides of the reach in closet and behind the return walls. We always recommend adding units with drawers, doors, and pullout baskets in the center of a reach in closet design as to not be interfered with when opening.
It is important to remember to also measure the width and height of doors and other openings in your closet and to consider any sloped shoulders or obstructions, such as light fixtures, outlets, baseboard or crown moulding, and heat registers. Following these guidelines will ensure you have all the measurements you need to design your dream closet. Following these first steps allow you to check your measurements when you enter then into ŪCRËATË®. Speaking of ŪCRËATË®, let's get to designing your closet!
Designing Your Dream Closet: Start Your Closet Design with the ŪCRËATË® Closet Planner.
Designing a closet that optimizes space and keeps everything organized is key to a well-functioning room. Regardless of the size of your closet, exploring various designs will help you create a practical and visually appealing storage solution that is perfect for you. If it isn't perfect for you on the first try, Dakota Closets is easily adjustable for you to modify in the future with just a screwdriver.
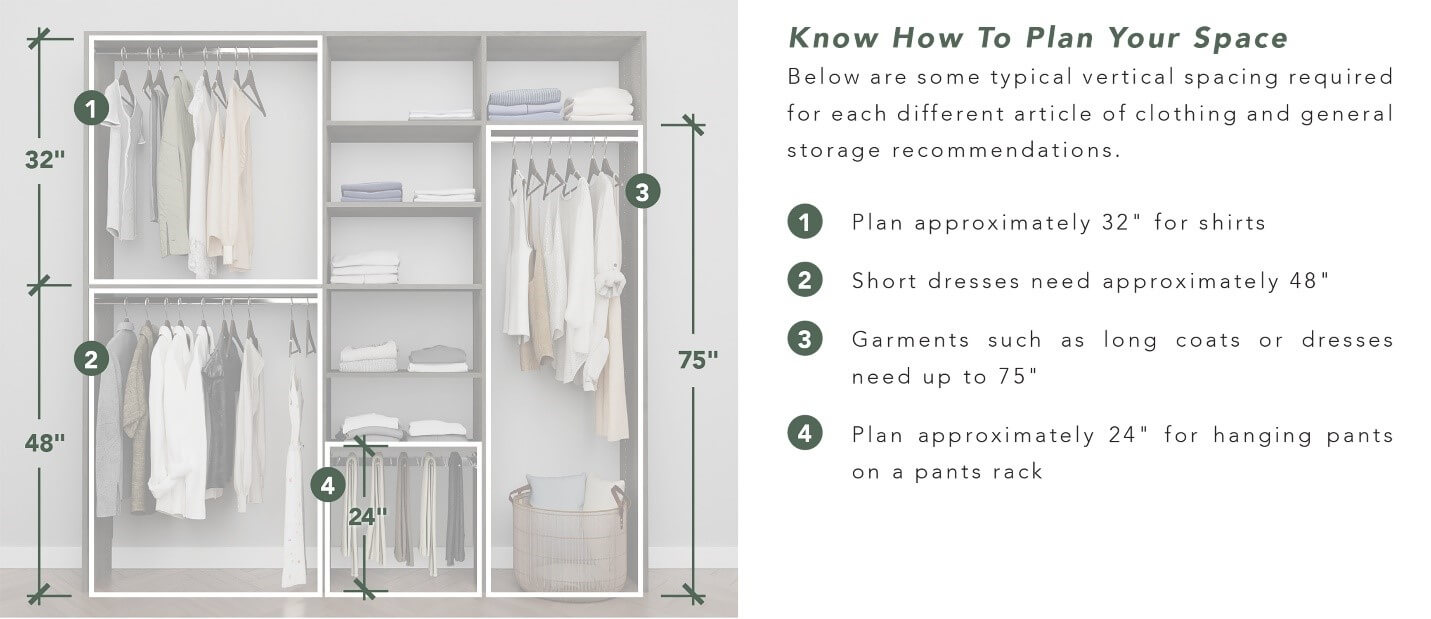
Begin your design process by assessing your storage needs. Think about what you'll be storing - clothes, shoes, and accessories - to determine the amount of hanging space, shelves, and drawers you'll need. View our buying guide to help plan for the length of clothes when hanging to maximize your vertical organization space.
Use our ŪCRËATË® Closet Planner to create your closet using the measurements you gathered in the previous steps. Start by selecting a room or closet shape and entering in your measurements. After that, it's as simple as filtering by your preferences and placing selections in your room. You will also get options to use gap fillers to make the most of your space. When you use UCREATE, it is best to login to your Menards.com account or create a new account so you can save your work and access your design at any time to make changes.
Remember, even the smallest spaces can be optimized. Baskets, bins, or drawer dividers can also help keep smaller items organized and within reach. And can easily be accounted for by using the accessories page in ŪCRËATË® to add any additional parts to customize your design.
At Dakota Closets, we offer a wide range of customizable closet organization systems that can be tailored to your specific needs. From pull-out pants racks to tie and belt organizers, we've got you covered. When designing your closet, consider your personal style and choose colors, materials, and finishes that match your home's aesthetic. This will ensure your new closet is not just functional, but also a space you'll enjoy using every day.